


Running sound for worship has just as much potential for error as any live sound gig—and while some mistakes are unavoidable, you can increase the odds of a perfect service by following these tips.
1. Knowledge is Power
The more you know about what you’ll be doing, the better you can prepare, and the easier it will be to avoid mishaps and frustration. So, make sure the following is covered before you even think of hitting the “on” switch.
- Have the worship leader send you the list of songs and the arrangements
- Find out about the band personnel and their requirements. For example, a drummer who uses acoustic drums is going to require a lot more preparation than one who uses electronic drums.
- Ask for a stage plot
 Definition:
A visual representation of a stage set up, equipment, sets, and locations.. You need to know where people will be, if for no other reason than so that you can come prepared with the right cable lengths. - Check whether there will be guest speakers—you may need a different mic, or mic stand.
- Arrive at the church in plenty of time to make sure everything is working properly.
2. Labels Are Your Friends
You’ll spend much more time troubleshooting a system than mixing—gear will break, buzz, or stop working, and you’ll have to figure out why. To help locate the problem faster, label all the connections, cables, snakes, consoleDefinition:
A control surface for audio, video, or lighting control positioned like a desk. Also called, Mixer, Controller, Board, or (British) Desk. inputs and outputs (Fig. 1), and processors.
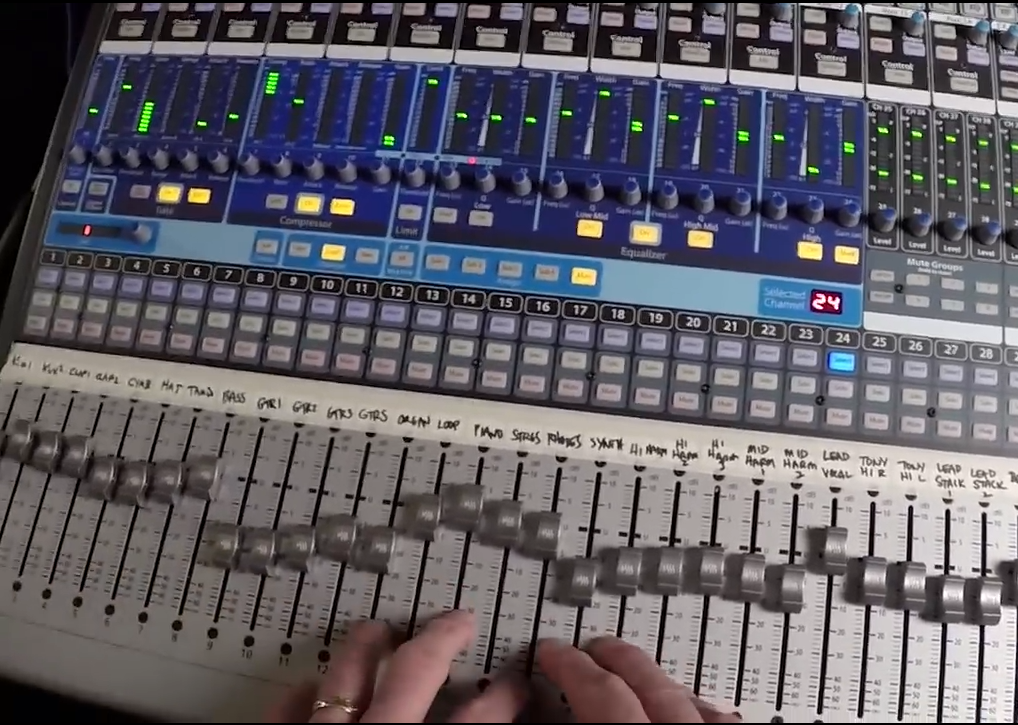
If you have to bring the level down all of a sudden because of feedback from a singer, with proper labeling you’ll know which faderDefinition:
An audio control, rotary or linear, to control volume level. to grab.
3. Get the Sound Right at the Source
There aren’t any microphones that make bad sources sound good, so the sound has to be right at the source. Guitars need to have new strings and proper intonation. Worn-out drum heads need to be replaced. Fix kick drum pedal squeaks. Tune instruments with electronic tuners, and tweakDefinition:
1. To make minor adjustments. 2. A person who is a perfectionist. keyboard and ampDefinition:
Abbreviation for either Ampere or Amplifier. presets in advance for consistent levels. Take the time to try different mics and mic positions, and place them correctly with respect to floor monitors, drums /guitar amps, and proximity to the source.
4. The Importance of a Plan B
No matter how much preparation you do, there will always be last-minute changes. Be flexible, and be like a chess player who thinks several moves ahead—what if someone knocks over the mic stand? If a cable starts crackling, is the replacement by your side or in your truck? The more you can anticipate problems, the fewer problems you’ll have.
5. Keep Your Eye on the Prize—Not the Mixer
You need to know your mixerDefinition:
Combiner, controller, and router for multiple audio or video signals. so well that you can run it with your eyes on the platform and the congregation—otherwise you’ll miss cues, solos, when to muteDefinition:
1. To silence or squelch an audio signal. 2. A switch that silences a signal. or unmute a microphone, see where level problems might be happening, etc. Your priority is to scan the horizon (Fig. 2), and be mindful of what the team and the church need you to do. Look at the mixer only when something actually requires adjusting.
6. Mix at the Right Level
The congregation is a more effective gauge for attaining the right level than your meters could ever be! If the levels are too soft, the congregation typically will not engage because they don’t want to be heard singing over the band. If it’s too loud, the people will be sitting, listening as if at a concert. When the levels are just right, you’ll see that them involved and engaged in the worship.
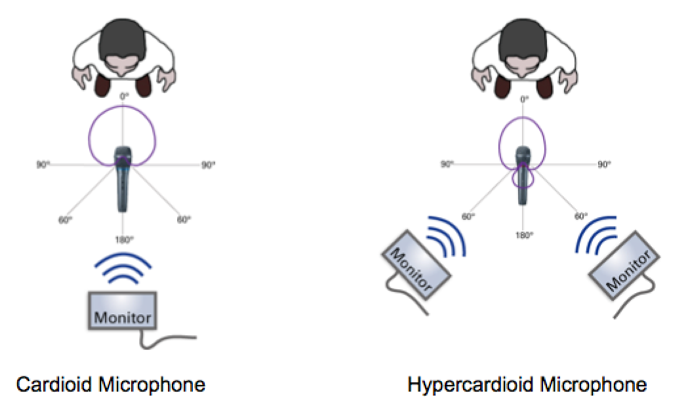
7. Eliminate the Feedback
Feedback is the world’s most disliked uninvited guest. Microphones that are too close to a loudspeaker or too far away from a source are the main causes of feedback. If the singer moves too far away from the mic and you try to compensate by raising the level—feedback, so make sure the singer understands proper mic technique. Also note that where a mic doesn’t pick up sound is just as important as where it does pick up sound, so place sound sources and floor monitors in the microphone’s nulls (Fig. 3).
Also, ring out your loudspeakers—this is the process of using equalizers to reduce specific frequencies that are prone to feedback. Finally, use the low-frequencyDefinition:
A value, expressed in Hertz, that indicates how many cycles of a periodic signal occur in one second. rolloff switch with directional mics to reduce the proximity effectDefinition:
A phenomenon where most microphones with cardioid or figure-8 polar patterns exaggerate bass frequencies as the sound source moves closer to the microphone. Also called Bass Tip-Up., where bass increases when someone moves closer to the mic.
8. Right Gain, No Pain
Make sure that every input has the right amount of gain. One situation that will mess up your levels is having open microphones on the stage that are not being used at any given moment. Having as many unused, open mics as active mics will reduce your system’s gain by about -3 dBDefinition:
1. A deciBel is a logarithmic ratio between two quantities, and is a nonlinear measurement that mimics human perception. 2. A unit expressing sound levels relative to a nominal level just audible by the average human ear, and equal to 1/10th of a Bel., due to the increased potential for feedback. Mute the mics until they’re going to be used, then unmute them just before they’re needed. This is why Tip #5 is so important—missed cues are right up there with feedback in terms of being very noticeable mistakes.
9. Keep the Vocals on Top
In many churches, sound checks start with the kick drum and end with the lead vocal—but this rarely leaves enough headroomDefinition:
1. The safety margin for an electronic signal that accommodates peak signals without overload. It is the difference (in dB) between normal operating levels (0-VU) and the clipping (overload) point. 2. The space between a subjects head or top and the top edge of a screen frame. for the vocals to be heard. So, optimize the lead vocal first to establish an upper level limit on how loud the vocal needs to be. Then do the kick, drums, and bass. Listen to the lead vocal with drums and bass to hear how they mesh. Now fill in with the guitars, keyboards, and background vocals. We don’t leave church humming the kick drum, so always keep the lead vocal on top.
10. Tame the Stage
If the stage volume is too loud, your house mixDefinition:
What the audience hears at a live performance. doesn’t stand a chance. In some cases the stage is so loud you can’t even hear the main system. In-ear monitoring will greatly reduce the level on the platform. If you’re using wedges (floor monitors), position them carefully, angled as needed (aim monitors at their ears, not at their kneecaps or backside), so that the musicians hear what they need without having the sound spill over into the congregation.
Set levels for the house before adjusting monitors so that the musicians have a sense of the room in which they’re playing. Simplify the monitor mixes to emphasize STP (self, tempoDefinition:
A composition's rhythmic "pulse rate," usually specified in BPM or Beats per Minute (i.e., the number of quarter notes that occur in one minute). and pitchDefinition:
For a given range of audio frequencies, pitch represents where a single sound falls within that range.)—that’s really all you need. Complex monitor mixes actually make performing more difficult.
And here’s a bonus tip that will make your life easier: When the service is over, make sure everything is taken down and stored correctly. Return mics to their protective pouches. And of course, wrapping the cables the right way will save you an inordinate amount of time when getting ready for the next setup.